Hello Hexo - Setup with Visual Studio Team Services CI/CD, GitHub pages and Cloudflare
I no longer felt a need to have a full fledged Wordpress as I’m not using this platform much. I looked around alternatives and found some interesting static site generators. I decided to go for hexo for now, it seems really nice. Going for simple simple design with focus on content (which of there are almost none).
Setup
The site is now hosted with GitHub pages and I’m using Cloudflare for DNS, caching and enabling SSL for custom domain. I’ve automated deploy with Visual Studio Team Services, when pushing to master branch on VSTS repo it automatically generates static content during build and then automatically creates a release and deploys it to my GitHub Pages repository.
Hexo
Hexo is a static site generator based on NodeJS where you write content with Markdown. I installed the latest NodeJS and started to follow hexo getting started guide. First I installed the hexo-cli globally.
npm install -g hexo-cli |
Then I created a new project named mollwhexo.
hexo init mollwhexo |
After that I started to look for a theme. I liked the cactus-dark theme but I had som modifications done to it, I also installed some plugins that the theme required.
From now on I could serve it locally with hexo server command.
hexo server |
From my last Wordpress installation I had a post I wanted to migrate. I found the migrator plugin for Wordpress and had no issues converting the post, even seems to have the same permalink. There are several interesting plugins found on hexo’s site here.
I started with this post with the new post command.
hexo new post hello-hexo |
Initialized a git repository.
git init |
Added a .gitignore file.
.DS_Store |
Finally added all and commited.
git add . |
Visual Studio Team Services
I’ve registered an account VSTS, which is free for up to 5 users. Created a new project named mollwhexo and pushed local repository to the project.
git remote add origin https://mollwe.visualstudio.com/DefaultCollection/_git/mollwhexo |
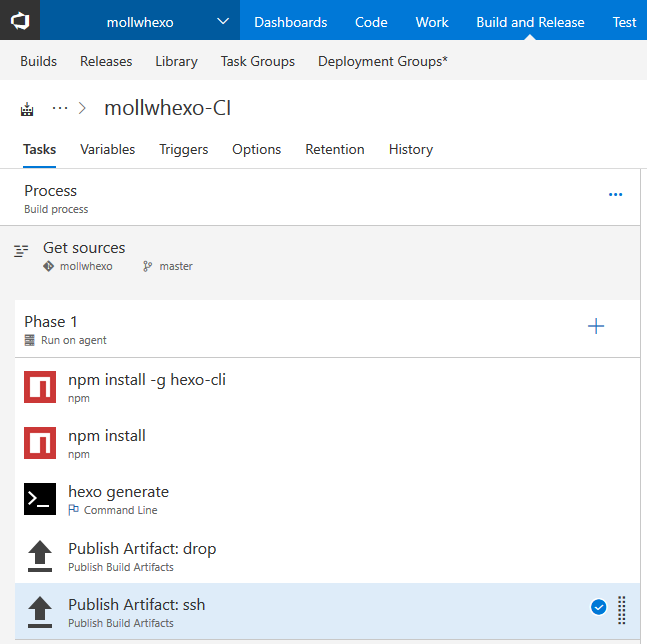
Next step was to setup continuous integration in VSTS. Created by going to Build and Release -> Builds -> New. My configuration looks like below.

It basically does this:
npm install -g hexo-cli |
I hade an issue with generate because the theme was in it’s own git repository and therefore the files weren’t commited. I removed the .git folder inside the theme and then added and commited all the theme files.
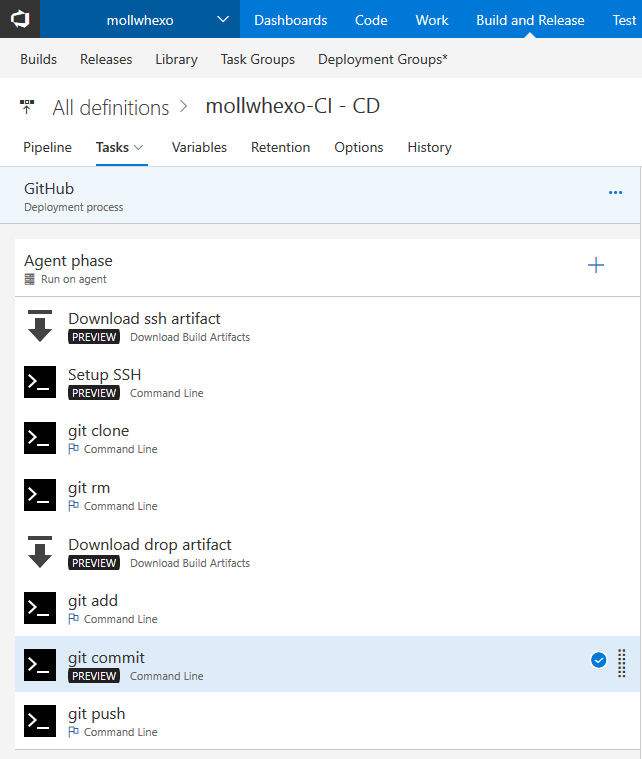
So now it builds automatically on new pushes to master branch. Next up was continuous delivery. I had a release configuration made Build and Release -> Releases. Added mollwhexo-CI (the result from build) as an artifact and then set up a new environment for GitHub. The commands in this release configuration is run with the Hosted Linux (Preview) agent queue so you know.

Now, everytime the a build is performed a deployment to GitHub Pages also follows.
GitHub Pages
A GitHub page for my user was set up by creating a repo named mollwe.github.io (repo). To be able to push from VSTS I added a deploy key. First I created a SSH RSA key pair.
ssh-keygen -t rsa -b 4096 |
Then I created a folder named .ssh and copied both private (id_rsa) and public key (id_rsa.pub) there. I also created a SSH config file (simply named config).
host github.com |
The content of the public key was copied into deploy keys on repository settings on GitHub. I added a step to create another artifact for SSH in Build Configuration. And in Release Configuration I created some steps to set up connecting to GitHub with ssh instead of https, this is required to be able to push from VSTS without using the real username/password at GitHub.
Setup SSH |
To update the git repository VSTS first clones from GitHub into a folder named drop.
git clone [email protected]:mollwe/mollwe.github.io.git drop |
Then it removes all files in repository.
git rm -r * |
The next step is to download the drop artifact into the git directory and then adding the new files.
git add . |
By doing this deleted but again added identical files will not be detected as changes, only actual changes will be committed. Because of git not being automagically configured with user on the agent, it’s configured before committing. You might note that I’m using a variable from VSTS to set message for commit, variables can be added but you can also use predefined variables, look here.
git config user.email "[email protected]" |
And finally the commit is pushed.
git push |
One thing I missed was that the README.md file got deleted at release. I added it to the hexo source folder but then it got rendered as html. I had to modify _config.yml and set skip_render.
... |
Cloudflare
First I added mollwe.se domain to Cloudflare as a free subscription and changed name servers to Cloudflare’s ones. I had to wait a while for it to go through for my DNS provider, maybe a day. In my GitHub repository I went into settings and set the custom domain. Then I updated the DNS entry for my domain in Cloudflare to point to GitHub by following this guide. Particulary I used this for an apex domain and DNS is now set up like following.
@ 192.30.252.153 |
However I noticed that the custom domain setting was reset at release and the site stopped working. I had to add a file named CNAME with mollwe.se as content and save it into the hexo source folder, this file was then included in each release.
Summary
Finally I have CI/CD with free hosting and SSL. Put several hours to getting this to work, hopefully it can help someone. If I’ve have missed something or anything is unclear please post a comment below and I’ll try to amend it.
Exported configurations mentioned earlier in the post can be downloaded here.